Showing posts with label sewing. Show all posts

Wednesday, January 07, 2015

A Weekender Finish

{A little preface - This is an huge amount of info for one bag, but I wanted to record it for future reference.  And in sharing things that did or did not work well for me, it will hopefully make your Weekending a little easier.}
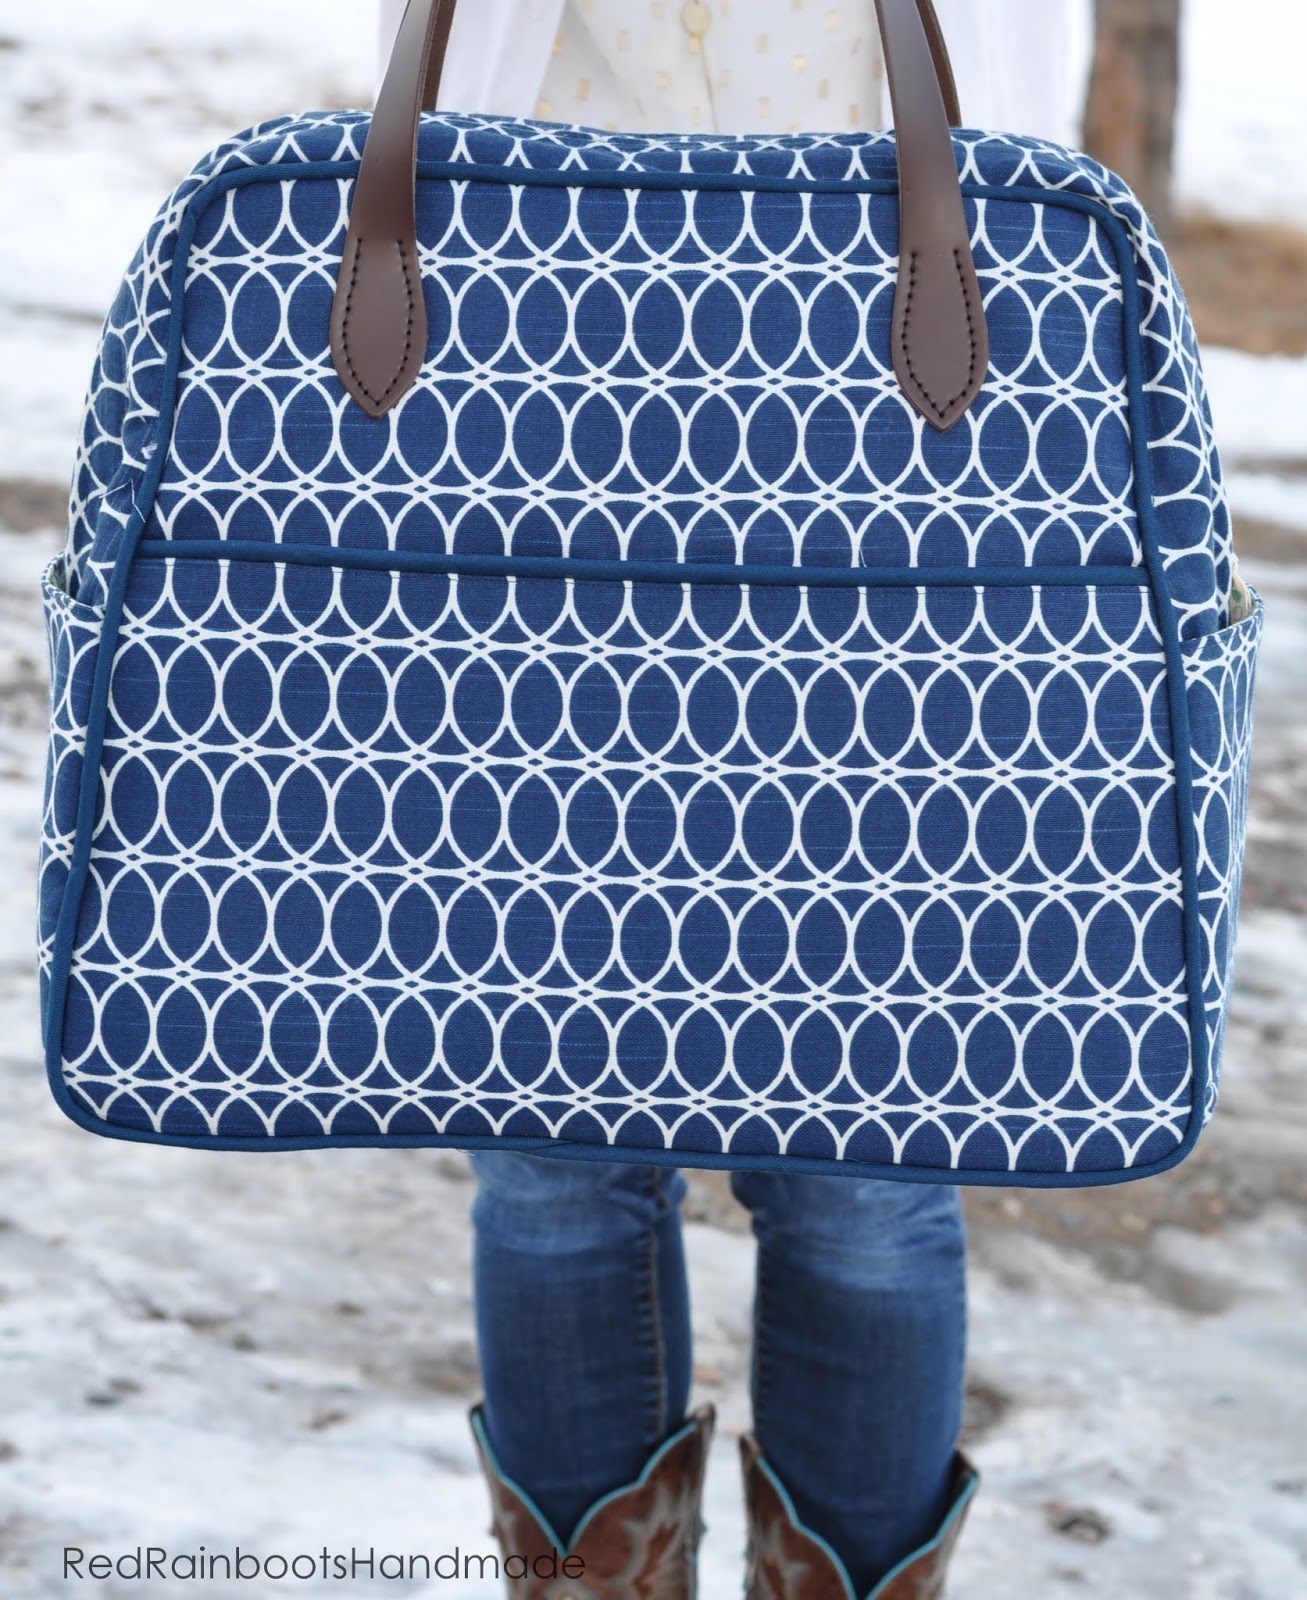
This past October, I experienced my first ever "Girls Sewing Weekend" with some of my sisters/mom and a few friends.  My friend Morgan and I both made Weekenders, and working on them together was so fun!
You can check out her super-cute Etsy Shop HERE.
Our bag styles were very different - and yet I loved them both!
And now that they are done, I'm excited to share with you a few things we learned and did along the way that helped simplify the process.
{what follows is just my opinions and advice... written a bit skattered... but hopefully helpful if you're just starting out...I've highlighted the main points for easy skimming. 
And If you want the particulars of my bag, but not the process, skip to the bottom of this post.}
If you already know exactly what you want your bag to look like, go for it!  But if you are undecided, here's what I'd suggest:
BEFORE YOU BEGIN
Selecting Fabrics
Do you like scrappy and quilted?  Large, bold florals?  Simple, minimalistic geometric? 
Here’s the first thing you should do: Make a folder on Pinterest just for Weekender Bag Ideas and pin the bags that catch your eye.  (Flikr and Instagram have a bunch). 
Go back and re-look at all your pins.  You will begin to notice a common thread between them. 
This advice my friend gave me was exactly what I needed to hear.
"Don't stress about trying to pick a fabric that you think other people will like... or that you think is probably trendy.  Just pick what YOU like.  Don’t worry about anything else." 
 
Advice and Add-Ons
There are a ton of blogs that have helpful ideas, share personal experience or changes they made, or have tutorials for extra add-ons to this bag.  You can learn a lot from them.  So much information can also be confusing. Trust the pattern!  If it's your first time making this bag, make it as written, unless you have previous experience with bag making.

The ONE THING I Would Do Differently
Use a "beefier" zipper for the outside of the bag - with bigger teeth and tab.  I used a standard zipper (one I had on hand), and now it seems a little wimpy.  When I go to unzip my bag, it is a bit hard to grab hold of the small tab.
SUPPLIES and COST
Use coupons and buy during sales.
Even with buying during sales, and using hefty coupons, the overall cost of the bag ran about $100.  Granted, I splurged and bought nice leather handles which added $20 to this total.
 
PREP WORK
Cut out all your fabric and interfacings in one fell swoop - an evening, or a few hours in the afternoon – it takes a chunk of time. 

MAKING YOUR BAG 
1 - If you are adding in any extras, make yourself notes (ahead of time)at those points in the pattern, so you don’t forget to add them, and then have to leave them out (speaking from personal experience here!).
2 - Go Slow.
3 - Don’t stress over broken needles.  If it makes you feel any better, I broke 4.  Three of them were because I kept forgetting to switch my needle position back, when rotating between my zipper foot and regular foot.  The other one was when I tried to sew too fast through really thick layers.
 4 - I opted to sew my bag lining in with my machine (rather by hand).  It looks like top-stitching, isn't going to pull or rip out easily.
MY BAG INFO
(all items purchased at JoAnn Fabrics unless otherwise noted)
- Exterior Fabric: Home Décor fabric
- Lining Fabric: DS quilting cotton
(*note: because it was a thinner fabric than called for, I used Pellon SF101 on all my lining pieces, to give it extra stability)
EXTRAS I ADDED
4 bag feet (or 6, and place 2 in the middle to prevent sagging)
2 magnetic snaps for the large outside pockets
Inside pocket (I used a 9” zipper and extra lining fabric)
Leather handles (from Etsy)
 Stitch Witchery ¼” – for making your cording (using your zipper foot works too.)
Clover Binding Clips (so you don't bend all your pins)
 
TUTORIALS I FOLLOWED
Making your cording - (Jen and Franz)
Attaching Leather Handles - (At Home With Mrs. H)
 
Hope this helps you have a little more fun Weekending!


Friday, June 27, 2014

Paper-Piecing for a friend

Have you ever tried paper piecing?  I just recently tried it - and surprisingly - it's so fun!  (I don't know why I thought it wouldn't be.)
I might have enjoyed it even more, due to how good it felt to sit down at my machine, since I was able to finally put down my paintbrush.  =)
I watched a few how-to videos, but when I tried it, I would get so confused with which direction the fabric would be facing, and how to figure out (from the back) if the paper was over the correct spot, and if it would cover the desired area once it was flipped backwards!  But then I watched a tutorial  (here) from Ellison Lane, it made perfect sense to me!  Loved her method!  And it made me fall in love with paper piecing.  Well - that, and this fabulous "70's Geese" pattern by Diane at From Blank Pages (available here on Craftsy).
I made it specifically for this friend I've gotten to know on Instagram.  She's the kind of person who is always doing thoughtful, giving things for others.  And yet sometimes I wonder how much is given back to her?  You know the type - devoted wife and mother, and faithful friend who's always there for you - always making and doing for others.  Ashley just moved into a new house which has a room just for her sewing stuff - and it has lots of bare walls.  I figured she needed to know how much she is appreciated (couldn't we all use more of that?).  And...she needed some help filling up all those fabulous bare walls.  =)

This pattern comes in several sizes.  I used the 18" pattern for this - and made it up into a mini-quilt. 
However, I'm thinking this would make a fabulous throw pillow, as well. 
I may or may not be making another one sometime soon.  You take a guess.  =)

Friday, May 09, 2014

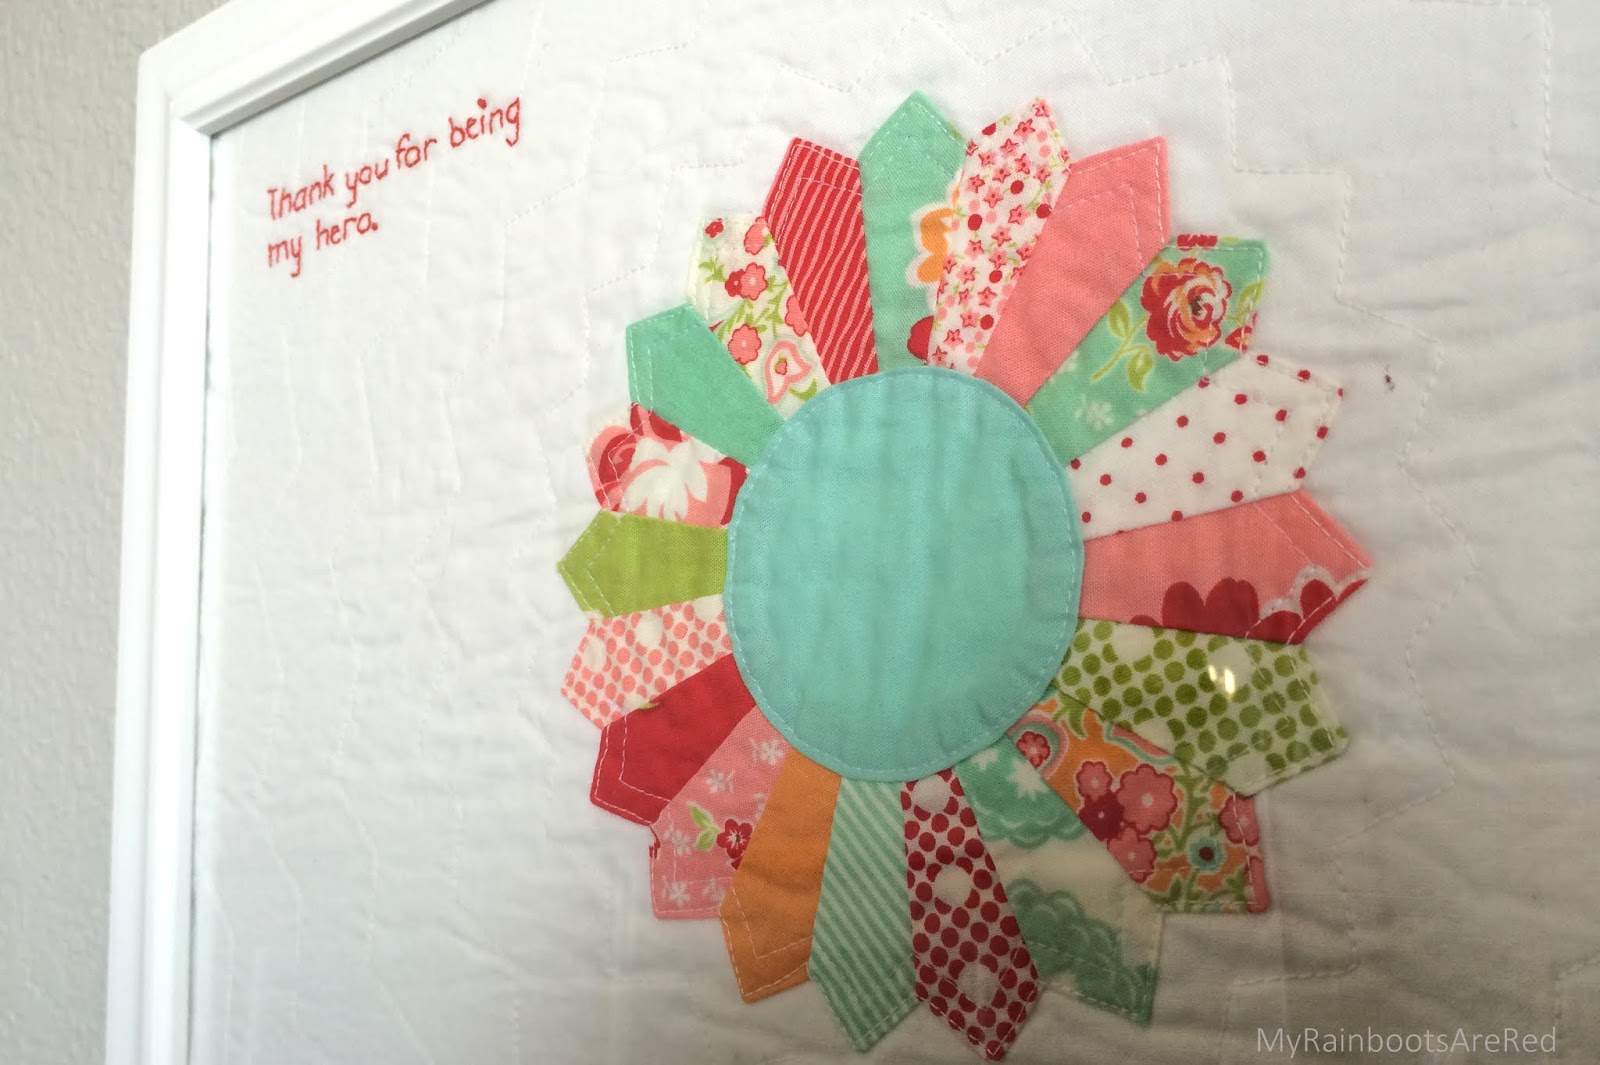
:: How to make mini-dresden framed art

I have a particular fondness for mini-Dresdens.  They are vintage (which I adore!) - absolutely perfect in their cuteness - a great way to use up those small fabric scraps - adorable when made into potholders -
and even cuter when put in a frame with a special word or message embroidered onto the background.
I've made a handful of them at this point - and I plan on making many more.  My oldest daughter is already asking when I'll make one to hang in a frame in their bedroom.  I made this one for myself, as a reminder of the amazing redemption story that came out getting scammed when I tried to buy a new sewing machine.
They are fast, fun - and highly addictive.  So, consider yourself warned.  =)

That being said, here's a quick run-down of how I make them.

You will need:
- EZ Dresden Ruler (or other type) and rotary cutter/mat
- (20) small 2.5" scraps,
- center circle fabric
- background fabric 12" x 15"
- cotton batting 12" x 15"
- picture frame 11" x 14" (including mat for 8"x10" picture)

1. I used my  EZ Dresden Ruler (by Darlene Zimmerman) to cut out (20) 2.5" blades from my scrap bin.   
2.  Sew your 20 blades together and press seams in one direction.
(if you aren't familiar with how to do this, there are many on-line tutorials).

3.  Print out (on paper) whatever word/phrase you want to embroider, in desired size and font.

4.  Figure out placement of Dresden and words.
- Lay your picture mat on top of your background fabric (so you can see where to place Dresden and words).  Place Dresden on your background fabric wherever desired, and use 4 pins to tack in place.  (I do mine slightly off-center - towards the lower right edge). 
- Place your printed words underneath your background fabric where desired, and trace onto your fabric, using a fabric pen.

5.  Now lay your batting piece underneath your background fabric, and pin or spray baste layers.

6.  Pin Dresden more securely, and stitch in place.
(I like to do a double-stitch.  Sew around very edge, and then 1/4" inside first stitching line)
5.  Make your center circle, and stitch in place.  (I follow this tutorial - it's fast, easy and works perfectly.  Best way ever!)
I used a cup or other round object from my house to draw a circle in the size I wanted. 
Note: you could also do a raw-edge circle, since it won't have much wear in a picture frame.

6.  Quilt (or don't)

7. Embroider word/phrase. (I use a double-strand of DMC floss - but whatever is fine!)

--(Note, if you want to wash it and get a crinkled look, zig-zag around raw edges and wash/dry now.)

8. Trim to desired size (11x14"), zig-zag raw edges, and frame!

And there you go!!!

Friday, March 14, 2014

:: Simple Girl Pattern - now available!

It's here!!  It's ready!! My "Simple Girl" pattern is finally done and available for download!!  (can I just say it: I'm excited!!)


I've made 3 of these covers in the past 2 weeks, and it is such a fun, rewarding project - and one that doesn't take much time.  For some of you, it could be whipped out in a day.  For me - where I squeeze in a few sewing moments here and there with my 5 little ones - more like a weekend or two very late evenings. =)
Like you, I have always wanted (and needed!) a cover for my sewing machine.  Not only to protect it from dust settling in it's nooks and crannies, but also from curious little fingers. =)  Recently I was able to look at a cover that my Grandmother made at least 30 years ago.  Hers was a picture of functionality (vs our generation's need to look-good-while-being-useful-at-the-same-time).  It was made with pre-quilted fabric and pre-made bias binding, but it served her for 30 years for the very same 2 purposes I was needing now. 

That faded yellow cover was exactly the spring-board I needed to design this Simple Girl pattern.  That, and the fact that I have a brand new Bernina 550QE that I really wanted to keep safe! (If you haven't read the amazing story of how I got my new sewing machine, you can read it here.)
 
For a downloadable PDF pattern of Simple Girl, visit www.Craftsy.com, or click here!!!
 
A few things:
1 -This pattern also has instructions on how to adjust the sizing to fit your machine!
2 - As seen in the pictures below, you can customize it to your hearts content.
3 - for instructions on how to make Continuous Bias Binding out of 1 Fat Quarter, click here.
4 - for instructions on quick and easy binding for your cover (or for a quilt too), click here.
 
Thank you to the sweet ladies who tested out my pattern when it was in the rough stages, and offered such helpful comments.  Their suggestions made this pattern what it is today.  Thanks ladies!  Here's a few of their covers...
 
 
Can you believe how creative they were?!  I can't wait to see YOUR Simple Girl cover!  Be sure to email me, or tag me (@julia_davis7) and tag your cover #simplegirlcover on your Instagram pictures!


Thursday, March 13, 2014

:: Quick and easy binding

So here's the quick and easy, for finishing the bottom edge binding for your Simple Girl cover. (or any quilt, for that matter...)
Stitch your binding onto the inside (lining) edge of your cover, using a generous 1/4" seam.
Your binding is now completely sewn onto the inside of your cover. Yay!
Fold your binding around to the outside edge of your Main Panel.  Using clips to hold it in place, topstitch along the edge of the binding. (Sorry about the different color of binding - but you get the general idea.)
And you are DONE!  (See...wasn't that easy?!)

:: Simple Continuous Bias Binding - Using 1 Fat Quarter!

Whenever I used to think of making bias binding I would shudder.  And walk away.  It seemed so hard - and the angles scared me - and I hated the idea of wasting precious fabric by cutting off that huge corner end. 

Recently I've been writing my Simple Girl Sewing Machine Cover pattern (for sale here) and guess what?  It has curved edges which required bias binding.  (ugh)  But wait!  There is an EASY, FAST way to make continuous bias binding, and it makes up to 5 yards with just 1 fat quarter of fabric!  I know there are probably 100 tutorials online that might show you how to do this, but for the benefit of my Simple Girl pattern, here's tutorial #101... 

Simple Continuous Bias Binding - using 1 Fat Quarter!
To start, remove the selvage and square up your fat quarter to 18" x 22" (or 18" x larger).
Stitch them together, using a very short stitch length (I shortened mine by half).  You will be cutting across your seams and this helps them to not come apart.
 Note: if you are making bias binding for the Simple Girl pattern - mark your lines at 2.5" wide.
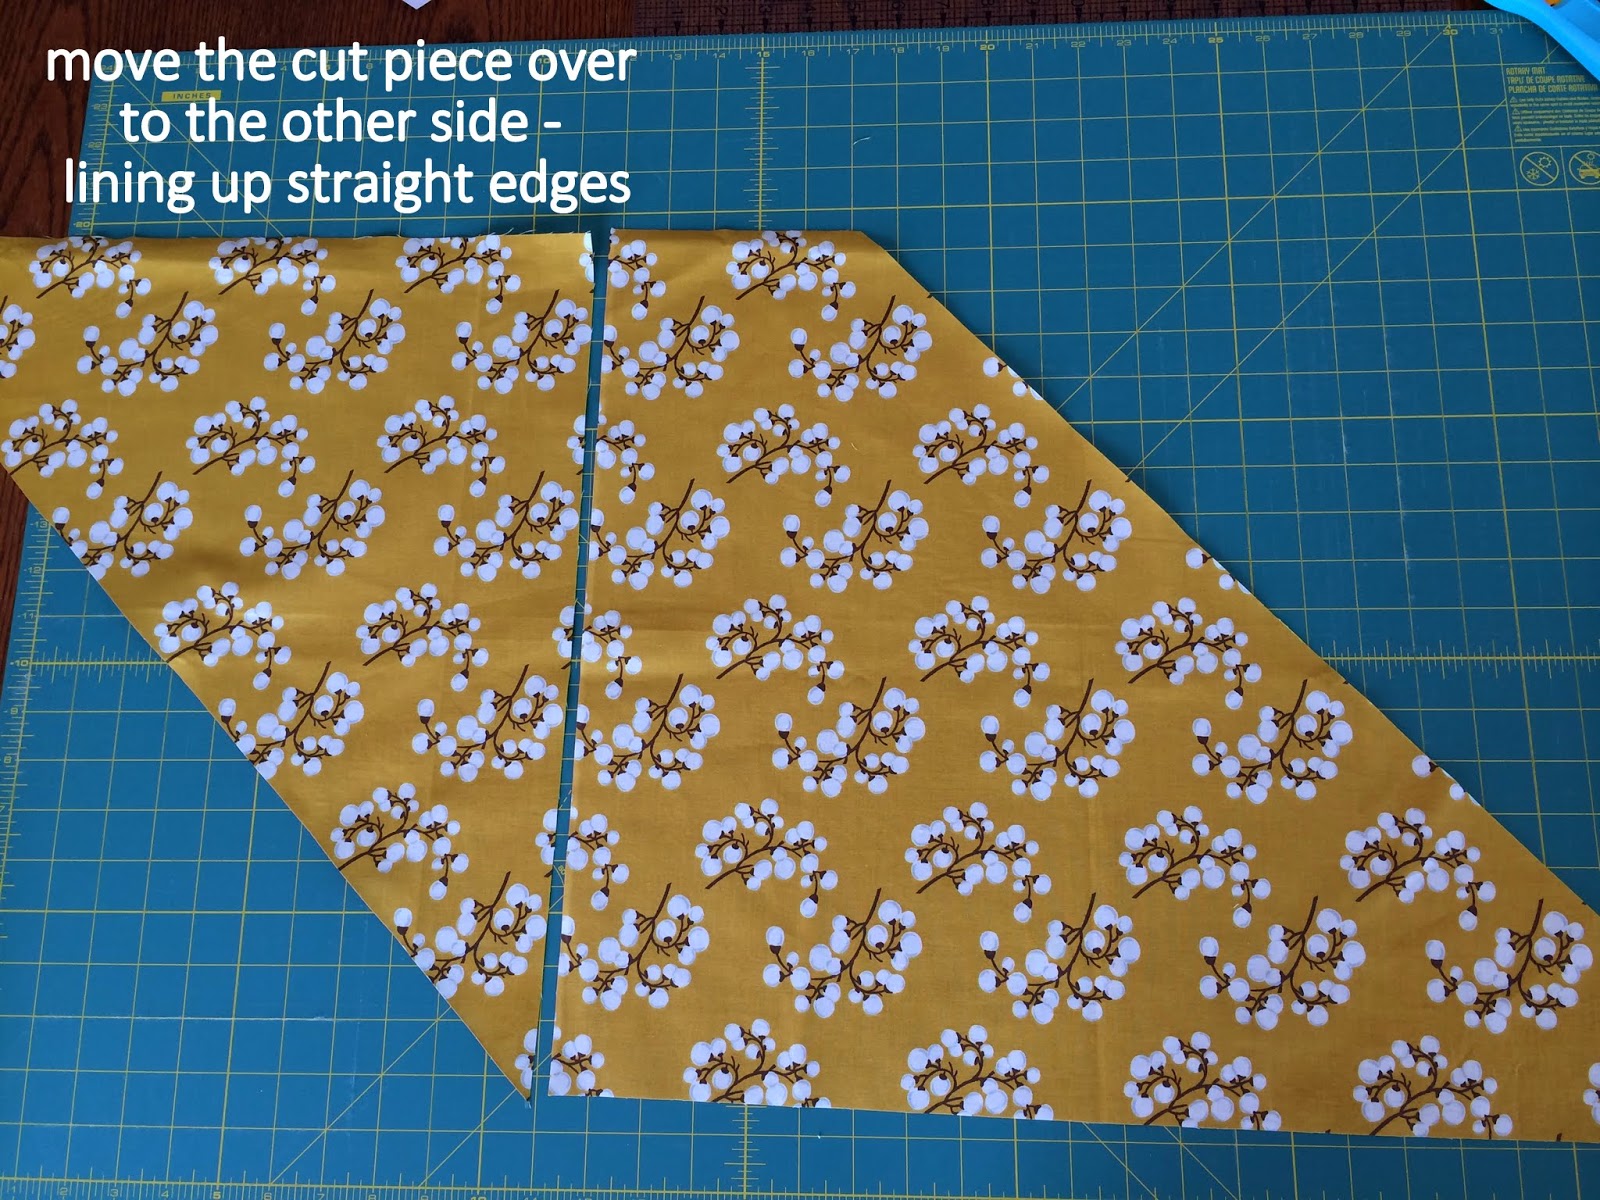
At this point, you're going to fold your fabric (right sides together) so the lines match up (basically making a tube).  You will want to slide one side over so your first drawn line matches up with the raw edge of the other side. (See drawing below.)

Your fabric will sort-of twist while you're doing this.
 
 Stitch along this edge with 1/4" seam.  (Again, use a short stitch length.)
Now for the fun part....
And now (depending on how wide you made yours) you have up to 5 yards of continuous bias binding!  (If you cut your binding strips 2.5" wide for the Simple Girl pattern, you will have approx. 4 yards of binding.)  And all of it with no stress - no sweating (well, hopefully) - and no waste!


Note: If you'd like more info on turning your continuous bias binding into French Fold (Double Fold) bias binding, visit this brilliant page (here) for measurements/yardages.
Related Posts Plugin for WordPress, Blogger...