Thursday, March 27, 2014

:: A quilt for a very special cause

I recently made this Baby/lap quilt out of my Arcadia scraps from the Square One quilt I made awhile back. 
I donated it to a special auction on Instagram that @CraftersForCourage organized to raise funds for CourageWorldwide.  They were raising money for Courage House - a home for minor girls rescued from sex trafficking.  They desperately need fund in order to help more girls, and it was such a special thing to be part of.
Quite a few people donated handmade items, there were many generous bids, and over $5600 was raised for Courage House.  The very sweet Theresa (@luckyhanks) placed the winning bid on this quilt, and it was sent off to her a few days later.   And now it's freshly washed, crinkled and put to good use in it's new home.

Quilt Info:
Pattern - "Square One" out of Camille Roskelley's book Simplify
Fabric - Arcadia and some Moda Bella cream
Backing and Binding fabric: JoAnn Fabrics

Friday, March 14, 2014

:: Simple Girl Pattern - now available!

It's here!!  It's ready!! My "Simple Girl" pattern is finally done and available for download!!  (can I just say it: I'm excited!!)


I've made 3 of these covers in the past 2 weeks, and it is such a fun, rewarding project - and one that doesn't take much time.  For some of you, it could be whipped out in a day.  For me - where I squeeze in a few sewing moments here and there with my 5 little ones - more like a weekend or two very late evenings. =)
Like you, I have always wanted (and needed!) a cover for my sewing machine.  Not only to protect it from dust settling in it's nooks and crannies, but also from curious little fingers. =)  Recently I was able to look at a cover that my Grandmother made at least 30 years ago.  Hers was a picture of functionality (vs our generation's need to look-good-while-being-useful-at-the-same-time).  It was made with pre-quilted fabric and pre-made bias binding, but it served her for 30 years for the very same 2 purposes I was needing now. 

That faded yellow cover was exactly the spring-board I needed to design this Simple Girl pattern.  That, and the fact that I have a brand new Bernina 550QE that I really wanted to keep safe! (If you haven't read the amazing story of how I got my new sewing machine, you can read it here.)
 
For a downloadable PDF pattern of Simple Girl, visit www.Craftsy.com, or click here!!!
 
A few things:
1 -This pattern also has instructions on how to adjust the sizing to fit your machine!
2 - As seen in the pictures below, you can customize it to your hearts content.
3 - for instructions on how to make Continuous Bias Binding out of 1 Fat Quarter, click here.
4 - for instructions on quick and easy binding for your cover (or for a quilt too), click here.
 
Thank you to the sweet ladies who tested out my pattern when it was in the rough stages, and offered such helpful comments.  Their suggestions made this pattern what it is today.  Thanks ladies!  Here's a few of their covers...
 
 
Can you believe how creative they were?!  I can't wait to see YOUR Simple Girl cover!  Be sure to email me, or tag me (@julia_davis7) and tag your cover #simplegirlcover on your Instagram pictures!


Thursday, March 13, 2014

:: Quick and easy binding

So here's the quick and easy, for finishing the bottom edge binding for your Simple Girl cover. (or any quilt, for that matter...)
Stitch your binding onto the inside (lining) edge of your cover, using a generous 1/4" seam.
Your binding is now completely sewn onto the inside of your cover. Yay!
Fold your binding around to the outside edge of your Main Panel.  Using clips to hold it in place, topstitch along the edge of the binding. (Sorry about the different color of binding - but you get the general idea.)
And you are DONE!  (See...wasn't that easy?!)

:: Simple Continuous Bias Binding - Using 1 Fat Quarter!

Whenever I used to think of making bias binding I would shudder.  And walk away.  It seemed so hard - and the angles scared me - and I hated the idea of wasting precious fabric by cutting off that huge corner end. 

Recently I've been writing my Simple Girl Sewing Machine Cover pattern (for sale here) and guess what?  It has curved edges which required bias binding.  (ugh)  But wait!  There is an EASY, FAST way to make continuous bias binding, and it makes up to 5 yards with just 1 fat quarter of fabric!  I know there are probably 100 tutorials online that might show you how to do this, but for the benefit of my Simple Girl pattern, here's tutorial #101... 

Simple Continuous Bias Binding - using 1 Fat Quarter!
To start, remove the selvage and square up your fat quarter to 18" x 22" (or 18" x larger).
Stitch them together, using a very short stitch length (I shortened mine by half).  You will be cutting across your seams and this helps them to not come apart.
 Note: if you are making bias binding for the Simple Girl pattern - mark your lines at 2.5" wide.
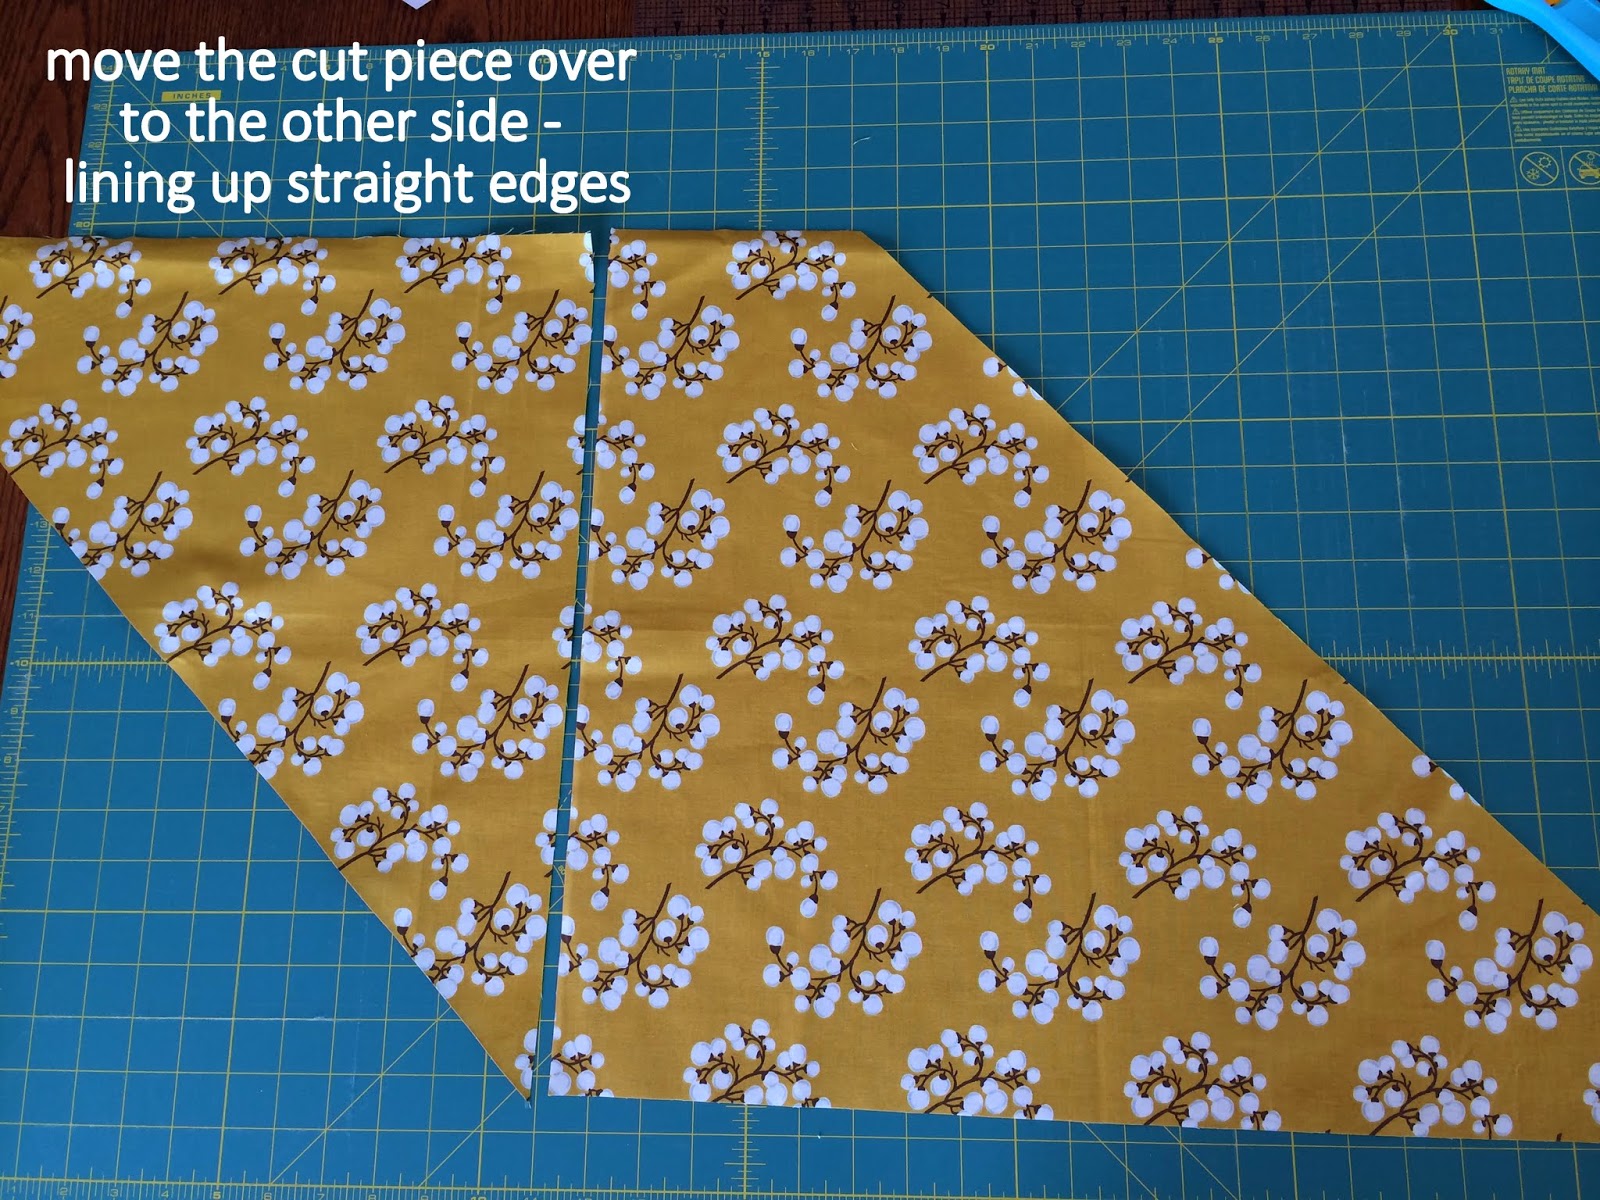
At this point, you're going to fold your fabric (right sides together) so the lines match up (basically making a tube).  You will want to slide one side over so your first drawn line matches up with the raw edge of the other side. (See drawing below.)

Your fabric will sort-of twist while you're doing this.
 
 Stitch along this edge with 1/4" seam.  (Again, use a short stitch length.)
Now for the fun part....
And now (depending on how wide you made yours) you have up to 5 yards of continuous bias binding!  (If you cut your binding strips 2.5" wide for the Simple Girl pattern, you will have approx. 4 yards of binding.)  And all of it with no stress - no sweating (well, hopefully) - and no waste!


Note: If you'd like more info on turning your continuous bias binding into French Fold (Double Fold) bias binding, visit this brilliant page (here) for measurements/yardages.
Related Posts Plugin for WordPress, Blogger...